

Do you need lots of equipment to take great photos? The short answer is no. The following article explains the details. The links in this blog post are affiliate links. I receive a small provision when you buy something via these links; however, that does not cause you any additional cost.
When you are travelling by plane you can't transport various cameras, lenses and flashlights. All airlines limit your hand luggage. Apart from that, carrying lots of photographic equipment is a burden when you are travelling. At most airports, you also have to walk a lot!
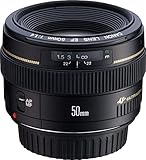
At the end of this article, I have listed the equipment, including links where to get it. You can take a lot of great photos by just using the available light. So, what is the minimum equipment for doing a photoshoot? You don't need much equipment for taking good photos. The basic equipment you need is a camera body and a lens that allows you to take photographs with a limited depth of field. I recommend the Canon EF 50mm F1.4 USM. This lens is easy to carry, allows apertures up to 1.4, and is not very expensive. If you are low on budget, you could use the EF 50mm F1.8 instead.

For taking the following photograph I used the EF 50mm F1.4 USM and an EOS 40D. The EOS 40D is no longer available on the market.

A more recent camera model is the EOS 90D. If you don't want to spend that much money, you can use the EOS 850D instead.

This was in the pedestrian zone of Málaga. It was a sunny day at the end of November. Therefore, I have chosen a street in the shadow. If you want to take photographs with natural light this will not work in a sunny area. I set the camera to aperture priority and chose an aperture of 2.8. This was sufficient for blurring the background. The camera set the shutter speed to 1/100 s. The ISO value was 100. If you use low aperture values then it's very important to focus on the right stuff. I set the focus on the eye of the model.
If you want to take photographs in a sunny environment you can use reflectors. However, I do not recommend using sunlight as the main light source. The sunlight is a hard light, and the shadows will not look good on your model’s face. Instead, I recommend placing the model so that the sun is slantwise in her back and reflecting some light in front of her using a reflector.
I recommend using reflectors from California Sunbounce. They are easy to use, and the smallest model, the Sunbounce Micro-Mini, fits well folded into a suitcase. Furthermore, you can mount them on a lamp tripod using a Grip Head. Otherwise, it would help if you had an assistant holding your reflector.
The Sunbounce Micro-Mini is sufficient for taking portrait pictures. However, for illuminating an entire person you need a huge reflector. For taking the following picture, I used a California Sunbounce Pro Gold Silver Zebra:

I used the same camera and lens as in the previous photo. I set the camera to aperture priority and chose an aperture of 4.5. The camera set the shutter speed to 1/320 s. The advantage of using reflectors is that you don't have to care about the camera flash sync speed. You simply set the camera to aperture priority, choose the desired aperture value, and you don't have to take care of anything else.
The disadvantage of reflectors is that you can't use them in a windy environment without an assistant. When I took this picture, I mounted my reflector on a Walimex Pro WT-806 lamp tripod. However, during the photoshoot the wind smashed my reflector several times. I recommend those who want to use this reflector without assistant to buy also the sandbags. In those days I didn't have the sandbags. In one of my blog posts about portable studio flash equipment you can see how the sandbags look like.
| Item | Comment |
|---|---|
| EOS 90D | A camera body |
| EOS 850D | A less expensive camera body than the EOS 90D. |
| EF 50mm F1.4 USM | A lens which allows to take pictures with low aperture values. |
| EF 50mm F1.8 USM | A much cheaper lens than the EF 50mm 1.4. |
| Walimex Pro WT-806 | A lamp tripod suitable for big reflectors like the California Sunbounce Pro. |
| Walimex Pro WT-803 | A lamp tripod which fits into a suitcase. Not suitable for big reflectors like the California Sunbounce Pro. However, it is sufficient for the California Sunbounce Micro-Mini. |
| California Sunbounce Micro-Mini Gold Silver Zebra | A reflector which fits into a suitcase. |
| California Sunbounce Pro Gold Silver Zebra | A reflector for illuminating an entire person. |
| California Sunbounce Grip Head | The Grip Head that mounts a California Sunbounce reflector on a lamp tripod. |
| Sandbags from California Sunbounce |